
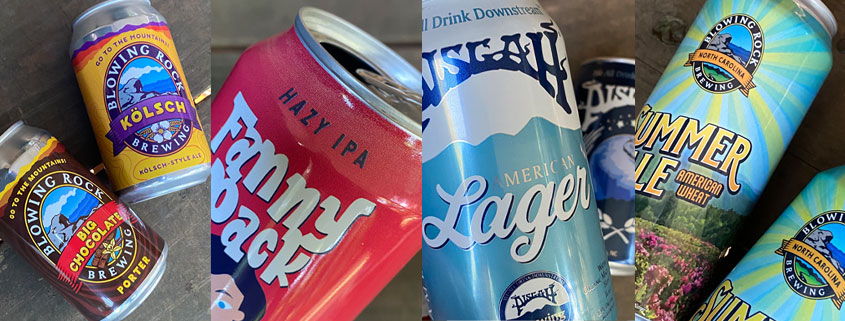
Sticker, Sleeve, or Straight-to-Can: A Printing Comparison for Craft Beverage Can Labels
If you’ve ever stood in a taproom, bottle shop or grocery store trying to decide how your next release should look on the shelf, you already know the label conversation goes way beyond artwork. The printing method you choose shapes your budget, your turnaround time, your minimum order quantities, and honestly, how the can feels in someone’s hand. I’ve designed labels for breweries, distilleries, and beverage brands for over 20 years now, and the question I get asked most isn’t “what should my label say”—it’s “how should my label actually be made?”
So let’s break down the four big options craft beverage brands are choosing between right now for cans: pressure-sensitive stickers, shrink sleeves, digitally printed (or “painted”) cans, and direct-to-substrate printing. None of these is universally “best.” Each one solves a different problem, and the right call depends on your volume, your timeline, and how often you’re planning to switch things up.
Pressure-Sensitive Sticker Labels
Pressure-sensitive labels are the classic workhorse of craft beverage packaging—a printed label with adhesive backing that gets applied directly to a can, bottle, or growler. If you’ve bought a 4-pack or six-pack from a small brewery in the last decade, there’s a good chance this is what you were holding.
The Pros
Pressure-sensitive is the low-barrier-to-entry option, which is exactly why so many brands start here. The application equipment is relatively simple and affordable compared to sleeve or digital can lines, so it’s a realistic fit for a brewery or beverage producer still building out its packaging line. You also get real flexibility: because labels are printed and applied as a separate step, you can add variable information—batch numbers, best-by dates, ABV—right at the point of application without reprinting a whole run. Durability is genuinely strong once applied correctly, and the range of finishes (matte, gloss, foil) and papers (uncoated, metallic, holographic) gives you a lot of design range for a relatively modest cost. Of the four options in this article, it’s typically the least expensive to get into.
On the design side, sticker labels can also be die-cut, meaning you can have a custom shape created for the label. This can be a game-changer for brand identity in packaging, as can be seen with Blowing Rock Brewing’s 12oz cans have the shape of a mountain range cut out of the top of the labels. (See figure 1.)
The Cons
The tradeoff is moisture. Pressure-sensitive labels are applied after the can is filled and often before it hits a cold environment, and condensation is the enemy—if adhesive doesn’t get a chance to properly set, you can end up with lifted corners or a label that slides right off in an ice bucket at a summer festival. It’s also worth noting that while it’s the most affordable of the four, it still runs a bit higher than old-school cold-glue paper labels if you’re comparing against the very cheapest legacy options.
On the design side, sticker labels have a gap above and below showing a good bit of shiny can, and between the edges of the wrap to where the metal can shows through. Not a huge deal, but it can make wrapping artwork and background elements from edge to difficult or disjointed.
Pressure-Sensitive Sticker Labels are Best For…
Small to mid-sized breweries and beverage brands that want design flexibility, need to print variable info at the label stage, and are working with a leaner production budget. It’s also a smart choice if you’re still figuring out your volume and don’t want to commit to specialized can-printing equipment.
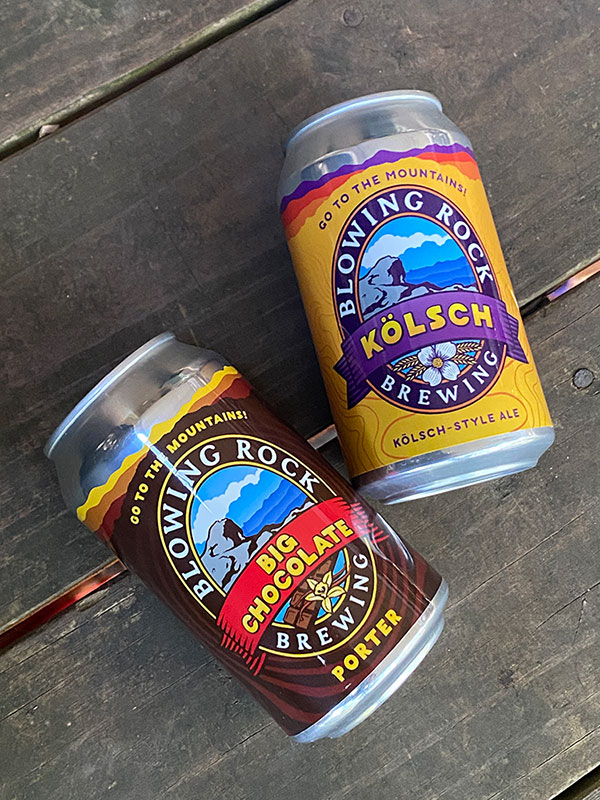
Figure 1: Die-cut pressure sensitive sticker label
Shrink Sleeve Labels
Shrink sleeves are a plastic film label, printed flat and then heat-shrunk around the entire container so it hugs every curve. This is the option behind a lot of bold, photorealistic can designs you see on store shelves—full 360-degree coverage, top to bottom, very little visible seams in the design itself.
The Pros
The headline benefit is coverage. A shrink sleeve can wrap the entire can, including the top and bottom curvature, giving you an almost edge-to-edge canvas that pressure-sensitive labels can’t match. Because the design is printed on the inside surface of the film, the artwork itself is protected from scuffs and abrasion during handling—it’s the can surface taking the wear, not the ink. The plastic construction also stands up well to moisture and condensation, which solves a problem pressure-sensitive sticker labels can run into. (See figure 2, comparing the same label as sticker label vs. shrink sleeve.)
The Cons
That premium look comes at a premium price—shrink sleeves typically run at least 25% more than pressure-sensitive labels. The application process is also more involved: sleeves are pre-shaped, applied over the can, then run through a heat tunnel to shrink into place, which means specialized equipment (and often outsourcing to a co-packer or converter if you don’t have that equipment in-house). And while sleeves handle moisture well, they’re not invincible—extreme temperature swings in transit or storage can cause warping or, in rare cases, peeling.
Shrink Sleeve Can Labels are Best For…
Brands that want maximum shelf impact and are producing at a scale that justifies the equipment investment or outsourcing cost. If your can design needs full-wrap, edge-to-edge artwork with little to no visible seams—think illustration-heavy or photo-heavy designs—shrink sleeve is often the only option that does the concept justice. Shrink sleeve cans are also something many contract mobile canners rely on since they can bring pre-labeled cans and don’t have to worry about the label applying process on canning day.
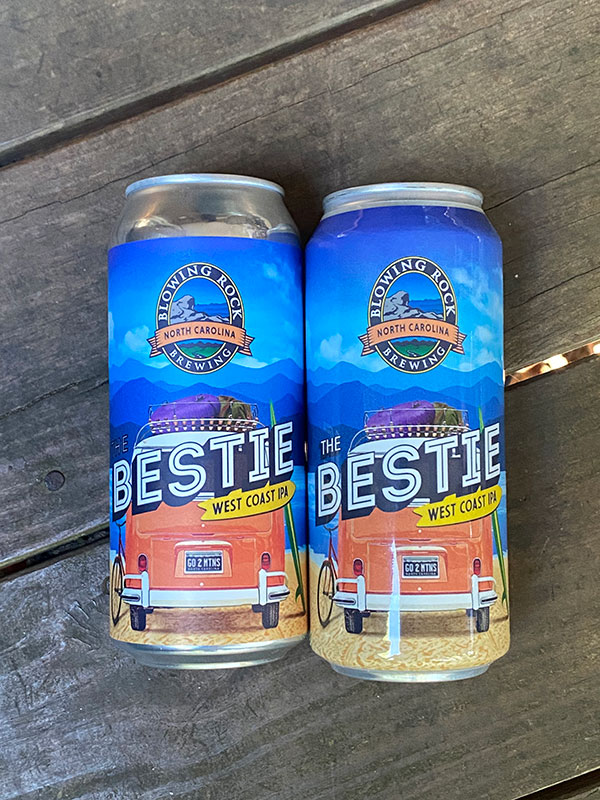
Figure 2: Sticker label vs. shrink sleeve
Painted Cans: Digital Printing on Assembled Cans
This is the newest player at the table, and it’s changing the conversation fast. Digitally printed—sometimes called “painted” cans—skip labels and sleeves entirely. The artwork is printed directly onto the finished, empty can using digital (typically UV inkjet) technology, so the design becomes part of the can itself rather than something applied to it.
The Pros
There’s no label edge, no seam, no separate application step—the finish looks genuinely seamless because it is. That also means you eliminate an entire piece of your production line: no labeling equipment, no applicators, nothing to maintain or troubleshoot in that step. Because there’s no adhesive and no film to worry about, painted cans perform great in wet, cold, refrigerated environments where pressure-sensitive labels can struggle. And because the process is digital, turnaround can be fast—some suppliers quote as quick as 10 days from artwork approval to finished cans, with no plates to make and no minimum order quantities anywhere near what traditional offset can printing requires (which can sit north of 150,000 cans). That makes it realistic for seasonal releases, one-off collaborations, and smaller-batch SKUs.
I personally have fallen in love with painted cans, and feel they provide the most bang for your buck when considering vibrance and coverage. Just look at how much more of an impact having the entire can covered makes when comparing the same label printed as a sticker label! (See figure 3.)
The Cons
Per-can cost is higher than pressure-sensitive labeling on a unit basis, even though you’re saving on labeling equipment and labor elsewhere—so the math really depends on your total system cost, not just the per-can number. You also lose some late-stage flexibility: once a can is painted, that’s the design, batch after batch until the next print run, so it’s typically not a format for adding variable data at the packaging line. And compared to shrink sleeves, digital can printing can sacrifice a bit of the ultra-fine photorealistic detail that a high-end sleeve print can achieve.
On the design side, painted cans tend to deteriorate toward the top/lid area. In other words, any artwork or solid ink from the top bend of the can to the lid end up with some banding or digital artifacts that don’t look as good as the rest of the can. (Not saying this is a deal breaker, but worth noting as an anal-retentive label designer!) (See figure 4.)
Digitally Printed Painted Cans are Best For…
Beverage brands who want a premium, integrated look without taking on labeling equipment, and who are releasing frequent limited runs, seasonal variants, or small-batch specialty cans where traditional offset printing’s massive minimums simply don’t make sense.
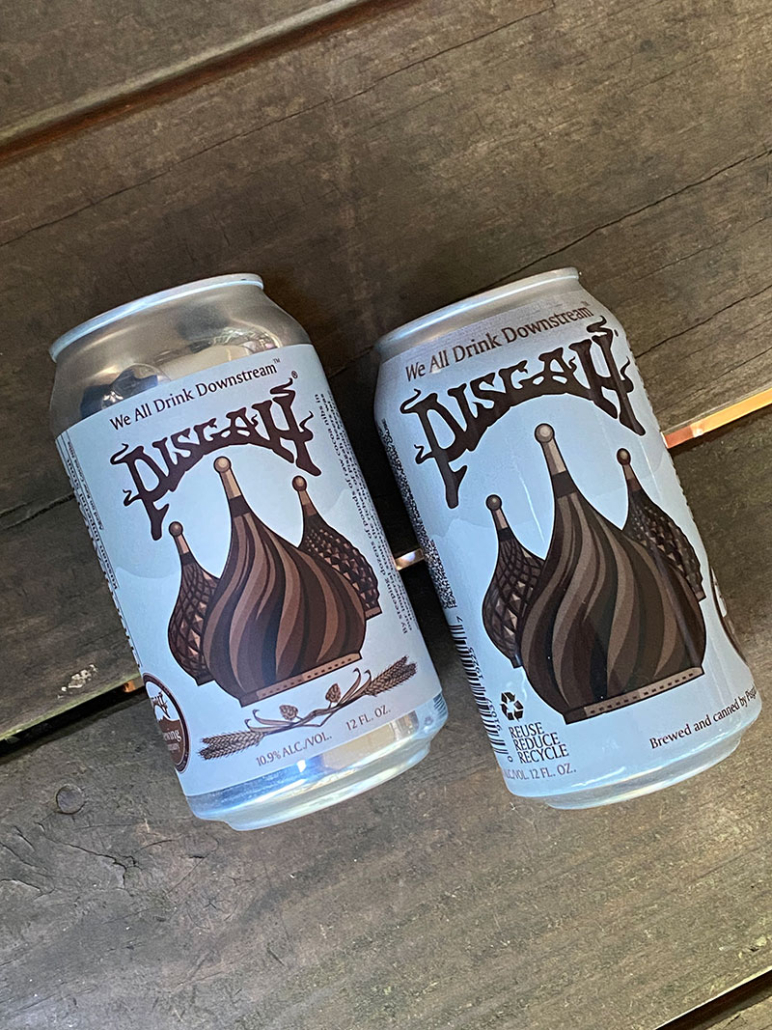
Figure 3: Comparison of the same beer label using pressure-sensitive sticker vs. painted can
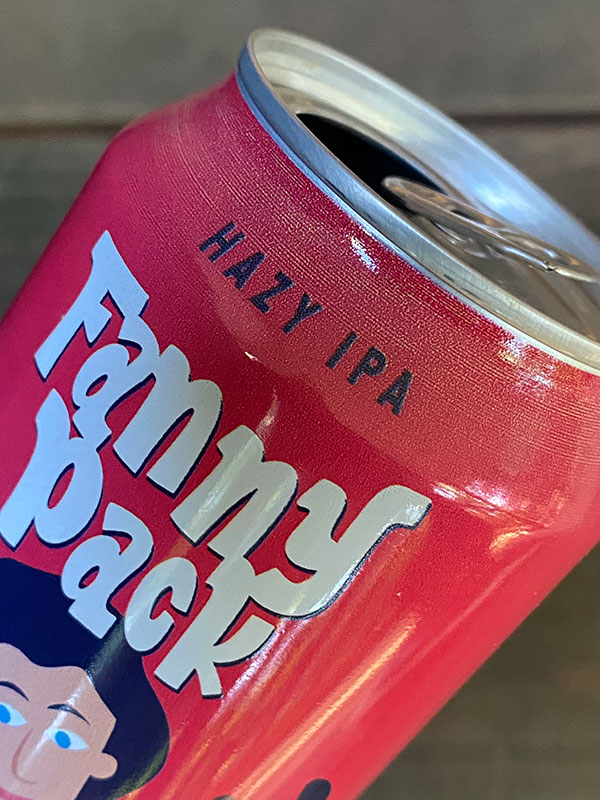
Figure 4: Knit-picky detail, aberrations at top of painted can label
Direct-to-Substrate Printing
Direct-to-substrate (DTS) printing is the broader cousin of the painted can—rather than being limited to cans on a filling line, DTS refers to printing artwork straight onto the actual container material itself, whether that’s a can, a glass bottle, a growler, or even a keg, typically using UV-cured inkjet technology that cures the ink instantly on contact. This is what the big boys—Anheuser Busch, MillerCoors—along with larger craft producers such as New Belgium, Sierra Nevada use to print cans. Most large canned soda, water and fruit juice brands use this as well. Take a look at how a Coke can is printed next time you have one and you’ll see a noticeable style in this arena.
The Pros
Like painted cans, DTS gives you a seamless, integrated look with zero label or sleeve in the equation, which means no adhesive failure, no harsh seam lines, and strong performance in the wet, cold conditions that beverage packaging lives in. Where DTS earns its own category, though, is versatility of substrate—it opens the door to printing directly on glass bottles, growlers, and other specialty containers that shrink sleeves and can-specific digital lines aren’t built for. It’s a strong fit for reusable or refillable formats and specialty merchandise (growlers, crowlers, glassware) where you want brand-quality artwork without a paper or film label that will eventually peel or fade. Priced per volume, this is the most cost-effective, which is one reason why large beverage brands gravitate towards this method.
The Cons
This is a more specialized corner of the industry, and access to equipment and qualified print partners is more limited than the other three options. You’re less likely to find a local vendor, and more likely to be shipping product to a specialty printer. Costs and capabilities vary widely depending on the substrate, the container shape, and the run size, so it takes more upfront homework to nail down real pricing than it does with an established pressure-sensitive or shrink sleeve supplier. You also have to order a truck load (literally, a tractor trailer’s worth) of cans at the usual minimums. (Followup question: where do you store these?) And as with painted cans, once it’s printed, it’s printed—there’s no swapping in variable data after the fact.
On the design side, DTS cans are restricted to a certain number of—typically up to 6—”line colors” and cannot be printed full-color CMYK. There is also a small tolerance line between each color that will show through to the aluminum (so the colors won’t bleed into each other) that can be a distraction or degradation to fine details. (See figure 4.)
DTS Printed Can Labels are Best For…
Breweries and beverage companies who do large volumes—typically reserved for those who order over 100,000 each of one label at a time—with space to store empty cans. Brands working in glass, growlers, or other non-can formats who still want that premium, label-free, seamless finish—or beverage brands looking to extend a painted-can aesthetic to merchandise and specialty containers across their lineup can also benefit from direct-to-substrate printed can labels.
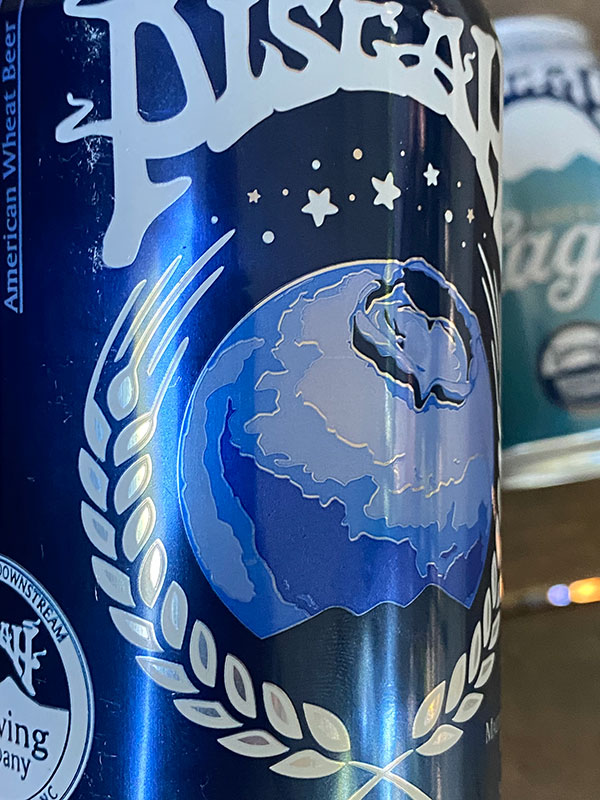
Figure 4: Direct-to-Substrate can label. Notice the thin breaks between each line color.
So Which Label Printing Technique is Right for Your Beverage Brand?
Here’s how I’d boil it down when a client asks me this over coffee (or a beer!)…
- If you’re just getting your packaging program off the ground and need flexibility on a reasonable budget, start with pressure-sensitive labels.
- If your design needs to wrap the entire can with zero compromise and you have the volume to support it, shrink sleeves deliver the boldest shelf presence.
- If you’re releasing frequent small-batch or seasonal cans and want that clean, integrated, no-label look without the minimums of traditional printing, painted cans are worth a serious look.
- If you’re printing a ton of cans and you have the space to warehouse the volume, direct-to-substrate could help you’re bottom line tremendously.
- Bonus: if you’re working in glass, growlers, or specialty formats and want that same seamless finish, direct-to-substrate is where to start asking questions. (uh oh, I mentioned other substrates! Maybe a future blog article, hmmm…)
None of these decisions happen in a vacuum from your actual label design. The printing method and artwork need to be developed together, because what works beautifully as a full-wrap shrink sleeve might need rethinking as a pressure-sensitive label with a visible seam. That’s the conversation I love having with brewers and beverage makers alike: not just what your label should say, but how it should be made so the design actually gets to shine the way you pictured it.
Label Design & Printing for Beverage Cans
Have a can, bottle, or crowler label you’re trying to figure out? Let’s talk about which printing format fits your brand and your production line best. And while we’re at it, let’s talk label design!
— Matt

Leave a Reply
Want to join the discussion?Feel free to contribute!